


Last updated: July 16, 2026
The fastest way to improve a Sora video is to fix quality at three stages: generate a simpler shot, preserve the cleanest master and apply restrained post-production. Upscaling can make a file larger, but it cannot reliably repair broken motion, changing faces, warped objects or missing details.
Before using this guide, note an important product change. OpenAI discontinued the Sora web and app experiences on April 26, 2026. The Sora API and Sora 2 models are deprecated and scheduled to shut down on September 24, 2026.
Therefore, the generation advice below applies to Sora API projects that remain active during the transition, while the editing workflow applies to Sora clips you have already exported. Export and securely archive existing Sora content as soon as possible. OpenAI’s Sora discontinuation notice provides the current dates.
What “Better Video Quality” Really Means
Video quality is more than resolution. A clean AI-generated clip needs:
- Natural detail and stable subjects
- Believable movement and physics
- Consistent lighting, colour and object design
- Smooth camera motion and synchronized audio
- An export that survives platform compression
First identify the actual defect. A soft image needs a different fix from flicker, identity drift or compression blocks. If the scene itself changes incorrectly, regenerate or edit the shot. If the scene is sound but looks slightly soft, post-processing may help.
Improve Quality Before Generating the Final Video
Select the Correct Model, Resolution and Duration
In the API, resolution and duration are parameters, not suggestions that can be added to the prompt. Writing “make it 4K” does not change the output size.
OpenAI’s current API documentation lists sora-2-pro as the production-quality option and the model required for 1920×1080 or 1080×1920 output. The regular sora-2 model is intended for quicker exploration and rough concepts.
Use this production sequence:
| Production stage | Recommended choice | Reason |
|---|---|---|
| Prompt testing | Short 4-second clip at 720p | Faster comparison of motion and composition |
| Refined draft | 4 to 8 seconds at the intended aspect ratio | Reveals continuity problems before a costly final render |
| Final render | Sora 2 Pro at the highest required supported size | Preserves more texture and lighting detail |
| Longer story | Several short approved shots joined in an editor | Usually gives more control than one overloaded scene |
OpenAI supports 4, 8, 12, 16 and 20-second API generations, but its prompting guide says instructions are generally followed more reliably in shorter clips. Two controlled four-second shots may look better than one complicated eight-second shot.
Use 16:9 for horizontal delivery and 9:16 for vertical delivery from the start. Cropping later can remove important details and reduce effective resolution. See the official Sora video-generation guide for supported parameters.
Write the Prompt Like a Single-Shot Brief
A strong prompt tells Sora what the viewer should see. Include:
- Visual style
- Subject and distinctive features
- Location and time
- Framing and lens feel
- One subject action
- One camera movement
- Lighting and three to five palette colours
- Short dialogue or ambient sound, if needed
Avoid vague instructions such as “make it cinematic.” Replace them with “medium close-up,” “slow push-in,” “soft window key,” “shallow depth of field” and a defined palette.
OpenAI’s updated Sora 2 Prompting Guide also recommends concrete framing, action, lighting and palette cues.
Use this reusable structure:
Style: Naturalistic premium product film with clean texture and restrained contrast.
Scene: A dark-green ceramic teapot on a walnut table beside a folded linen cloth at sunrise.
Camera: Medium close-up, eye level, 50 mm lens feel, shallow depth of field, one slow push-in.
Action: Steam rises steadily; a hand enters once and lifts the lid during the final second.
Lighting and palette: Soft window light from camera left, warm bounce from the right; forest green, amber, cream and walnut brown.
Sound: Quiet room tone, birds outside and one soft ceramic click. No music.
This prompt limits ambiguity while leaving enough room for natural texture.
Reduce Motion and Scene Complexity
Motion errors can look like poor resolution. Too many people, props, cuts and camera moves force the model to maintain several changing relationships.
Use one principal subject, one action and one camera move per shot. Express movement in countable beats:
“The actor takes three steps, pauses and turns during the final second.”
That instruction is clearer than saying the actor “walks dramatically.” Avoid combining a zoom, orbit, crane move and subject rotation in the same short clip.
If a shot fails repeatedly, lock the camera, remove background activity and simplify the action. Once the basic version works, add one layer at a time.
Use a Clean Reference Image When Consistency Matters
An input image anchors the first frame and can preserve composition, object design and colour. It should have the intended crop, clean edges and balanced exposure.
In the API, the image must match the requested video size and use JPEG, PNG or WebP format. Do not expect a small or blurry reference to become pristine. Remove accidental text, clutter and compression artifacts first.
Current API restrictions reject input images containing human faces and generation of real people through the standard workflow. Check the latest restrictions before planning a project around a person’s likeness.
For a recurring non-human mascot, animal or object, a reusable character asset can improve identity consistency across shots. Repeat the same name and core description in every prompt rather than changing adjectives between scenes.
Iterate Without Destroying What Already Works
Random alternatives make it difficult to learn which instruction helped. Compare versions systematically:
- Create a short baseline.
- Inspect it frame by frame.
- Identify the single largest defect.
- Change one variable only.
- Record the prompt, model, size, duration and result.
If the composition is good but the palette is wrong, request only a palette change. If the subject is stable but the motion is rushed, adjust only the timing.
OpenAI describes video edits as controlled nudges and advises simplifying the camera, action and background when a shot keeps failing. This preserves successful elements and makes every iteration informative.
Enhance an Existing Sora Video in Post-Production
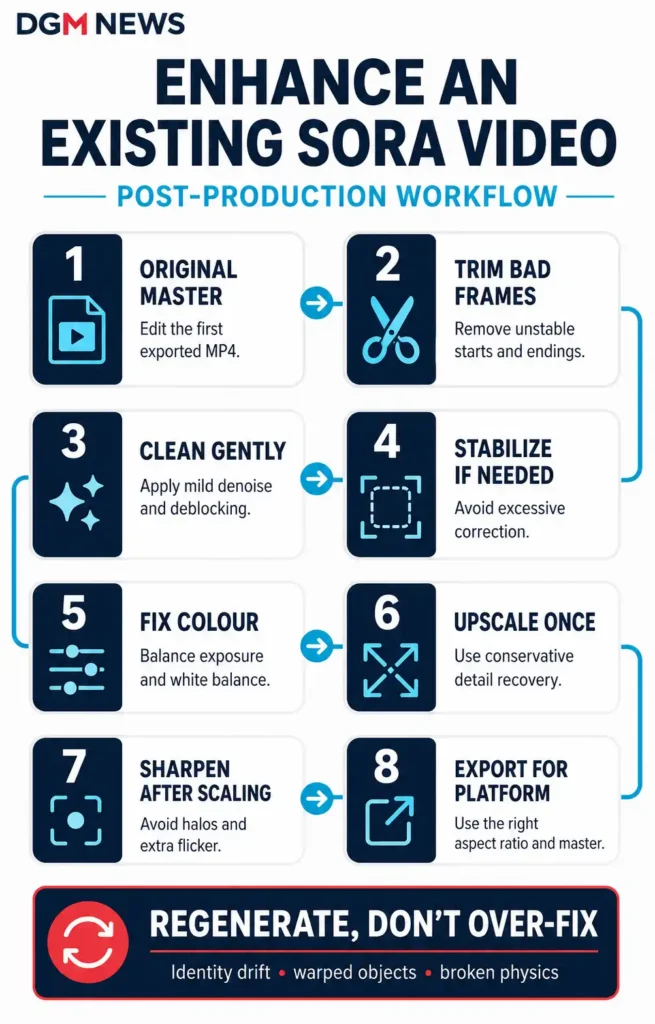
Start With the Original Master
Use the first exported MP4, not a copy downloaded from a messaging or social app. Repeated compression creates blocks, banding and soft edges. Save one untouched master and edit from a copy.
Apply Corrections in the Right Order
The safest editing order is:
- Remove bad frames or trim unstable beginnings and endings.
- Apply mild noise reduction or deblocking.
- Stabilize only if camera shake is distracting.
- Correct exposure, white balance and colour.
- Upscale if the delivery resolution requires it.
- Add light sharpening after scaling.
- Add audio, captions and the final platform export.
Heavy denoising can make skin, fabric and foliage look plastic. Strong sharpening creates halos around edges and can make flicker more visible.
Always compare the processed clip with the original at 100% size and in motion. A paused frame will not reveal every temporal artifact.
Treat Upscaling as Finishing, Not Reconstruction
AI upscaling can smooth jagged edges, reduce mild softness and produce a larger delivery file. It cannot reliably restore missing letters, correct malformed hands or make inconsistent objects physically accurate.
A “4K” export created from a lower-resolution source still contains estimated detail. Upscale once, use a conservative detail setting and watch fine patterns such as hair, grass, jewellery and brickwork for crawling artifacts.
If the defect changes shape from frame to frame, regeneration is usually better than aggressive enhancement.
Be Careful With Frame Interpolation
Interpolation creates new frames between existing ones. It can help simple, steady movement, but it may produce ghost limbs, doubled edges or warped fast-moving objects.
Do not apply interpolation automatically. Test a section containing the fastest movement. Keep the original frame rate if the added frames introduce visible errors.
Export for the Final Platform
Match export dimensions to the destination. Never stretch horizontal footage into a vertical frame. Reframe it or place it inside a designed vertical layout.
Retain the source frame rate unless a change is necessary, choose a high-quality export preset and upload the master directly. Do not send the final file through a messaging app before uploading it to YouTube, Instagram or another platform.
Sora Video Quality Problems and the Best Fix
| Problem | Likely cause | Best first action |
|---|---|---|
| Entire image looks soft | Low output size or compressed copy | Return to the original master or render at a higher supported size |
| Face or object changes | Over-complex action or weak identity anchor | Shorten the shot, simplify motion and reuse exact descriptors |
| Background flickers | Busy textures or excessive camera movement | Reduce background activity and use one slow camera move |
| Motion looks unnatural | Too many simultaneous actions | Break the action into countable beats or separate shots |
| Colours shift between clips | Different lighting language or grading | Reuse one lighting recipe and three to five palette anchors |
| Dialogue feels rushed | Too many words for the duration | Shorten the lines or increase the clip length |
| Video looks worse after posting | Platform recompression or wrong dimensions | Export once at the correct aspect ratio and upload the master |
| Upscaled clip has halos | Excessive sharpening or enhancement | Lower detail recovery and sharpen only after scaling |
A Five-Minute Quality Check Before Publishing
Watch the finished video once normally, once muted and once frame by frame.
Check subject identity, hands, props, reflections, horizons and colour across cuts. Listen on headphones for clipped dialogue or sudden ambience changes. Confirm that captions are readable and synchronized.
Finally, preview the uploaded version on a phone. Platform compression may reveal flicker, banding or text problems that were not obvious in the editing timeline.
Final Takeaway
To enhance Sora AI video quality, begin with the highest-quality source rather than relying on a one-click enhancer. Use the correct model and explicit resolution, build short and achievable shots, describe visible details, control motion in beats and keep lighting language consistent.
Then make restrained corrections from the original master and export once for the intended platform. This workflow improves both perceived sharpness and the qualities viewers notice most: stable motion, visual continuity, believable detail and clean delivery.